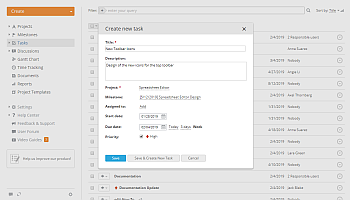
Once the project is created and the milestone is added, one more step is left. Distribute the tasks among the project team members.
To add a task,
- Click the Create button in the upper left corner and select the Task option from the drop-down list.
- Specify your task Title and enter a short Description, if necessary.
- Select the Project you need to add a task to.
- Assign a task to one of the available Milestones.
Use the none option if you don't want to attach this task to any milestone.
- Select the responsible person you wish to assign this task to from the Assigned to list.
You can assign the task to as many responsible persons as you wish selecting them from the list. To remove a person added by mistake from the list of the responsible persons, hover the mouse cursor on his/her name and click the  icon which appears to the left. All the responsible persons will be informed about a new task assigned to them by email.
- Set a desired Start Date selecting it from the calendar, or entering it manually in the following format dd/mm/yyyy.
- Set a desired Due Date using one of the available options: Today, 3 days, Week, or selecting it from the calendar, or entering it manually in the following format dd/mm/yyyy.
- Check the High option to set the task priority.
The  icon will be added next to the task title in the Tasks list.
- Click the Save button or use the Save & Create New Task button to save this task and start creating the new one right away.


The created task will be added to the Tasks list. The same way as many tasks as you wish can be added to your project.
If a task does not have a due date but belongs to a milestone, this task in the list is marked with the  icon and is displayed with the milestone due date.
To quickly create a new task on the base of the existing one with all its contents, such as attached documents and subtasks, make use of the Copy feature. You'll be able to create an exact task duplicate or make some minor corrections to it (e.g. select another milestone, responsible person or due date); create similar tasks within the same project or move task copies to another project.
- select the task you need from the Tasks list,
- click the
 icon to the right of the task title,
- select the Copy option from the Actions drop-down list,
- change the task details, if necessary,
- choose which items you want to be copied checking the Documents and/or Subtasks box,
- click the Copy button to duplicate the task or use the Replace button to remove the original task and add the copied one instead of it.
If you need to edit a task,
- select the task you need from the Tasks list,
- click the
 icon to the right of the task title,
- select the Edit option from the Actions drop-down list,
- make all the changes you need and click the Save Changes button.
You can attach documents to your task. Open the task page and switch to the Documents tab on the top. Here you can:
- create a new document, spreadsheet or presentation clicking the New file link and selecting the file type from the list;
- upload some documents from your hard disk drive clicking the Upload file link;
- attach files from the project that your task belongs to.
To manage documents attached to your task, place the mouse cursor over the attached document and use corresponding icons to perform the necessary action:
- open an existing document with the Online Editor clicking the
 icon;
icon;
- download an existing document to your hard disk drive clicking the
 icon;
icon;
- delete an existing document clicking the
 icon.
icon.
You can also quickly move several tasks at once from one milestone to another. To do that, check the tasks that belong to the same milestone and press the Move button above the task list. In the confirmation window, select a different milestone and press the Move to milestone button.
When the task is done, close it right in the Tasks list changing its status from Open to Closed. To do that, just click the arrow  to the left of the task title and select the necessary status from the list.
If some additional task statuses have been previously created by a full access or the 'Projects' module administrator, it's also possible to assign custom statuses to your tasks. To learn more on how to create and apply custom task statuses, you can refer to this article.
You can also change the status for several tasks at once instead of changing statuses one by one. To do that, check the necessary tasks, press the Change Status button above the task list and select the necessary status.
To delete a task, choose the corresponding option from the Actions drop-down list.
You can also delete several tasks at once instead of deleting them one by one. To do that, check the tasks you want to delete and press the Delete button above the task list.