Articles with the tag:
Close
Changelog
Close
Try in the cloud
Try in the cloud
  • All
  • Overview
  • Creating project
  • Managing your team
  • Scheduling workflow
  • Assigning tasks
  • Creating subtasks
  • Using Gantt chart
  • Leading discussion
  • Reporting project progress
  • Suspending/closing/deleting project
  • Changing Projects module settings

Overview

A project is an unique group activity with a definite beginning and end designed to achieve a specific goal. As a rule, during its life each project goes through five main stages:

  • Initiating

    Defining the main goal and objectives of the project.

  • Planning

    Developing a plan to execute the project: setting milestones, creating a project team, assigning tasks.

  • Executing

    Completing the work according the developed plan.

  • Monitoring

    Tracking and analyzing the project execution activities in order to define potential issues and make necessary corrections.

  • Closing

    Accepting the result of the project execution and completing the project.

Projects is a project management tool developed to help you successfully carry out the project through all these stages: schedule your workflow, manage your project team and distribute tasks between its members, track and report project progress in order to achieve the main goal of the created project.

To access the Projects module from any portal page, use the drop-down list in the top left corner of the page and select the corresponding option.

Projects are stored in the MySQL database.

Creating project

The very first thing you should do to coordinate the workflow is to create a project. To do that,

  1. Click the Create button in the upper left corner and select the Project option from the drop-down list.
    If you have previously created a template and want to apply it to a new project click the Select link under the Select project template caption and choose the necessary template. Use the search field to accelerate the search process. To learn more about how to create a template refer to this article.
  2. Specify your project Title and enter a short Description, if necessary.
  3. Assign a Project Manager.

    To do that, open the corresponding drop-down list and select a person you need. Sort all users by group or use the filter field at the top to facilitate the search. Check the box near this field if you wish to notify the project manager by email.

  4. Create a project Team.

    To start adding members to the project team, click the Manage Team link. Сheck the users you wish to add to your team. Use the filter field at the top to facilitate the search. Check the necessary group or the Select All option to add the users from the selected group or all the users respectively. Сlick the Save button. If you want to delete a user added by mistake, place the mouse cursor over the needed user and click the Delete member icon icon.

    All the selected users will be notified by email.

    When creating a private project (this option is enabled by default), you can also set access rights for each team member.
    Create New Project Create New Project
  5. Edit Project structure if it's necessary.

    Click the Add milestone link and introduce it's 'Title' in the corresponding field, then set it's due date, choose the responsible person from the list and click the Ok button. You can easily Edit, Add a task to a new milestone or Delete it using the Actions Icon icon.

    To add a new task to the created milestone you can also move the mouse cursor over the milestone and click the Task link, enter the task title, select a responsible person and click the Ok button.

    Use the Add task link situated under the Tasks without milestones caption if you want to add a task which won't belong to any milestone. Introduce the 'Title' of your task in the corresponding field, choose the responsible person from the list and click the Ok button.

  6. Add tags: click the Select link in the Tags section, check necessary tags in the list of the existing ones or create new tags. To create a new tag, click the Create new tag link, enter the tag Title and click the Create button. When necessary tags are selected, click Save.

    This helps categorize the project and facilitate the search for the other users.

  7. Check the Save this project as private box.

    This option is enabled by default. Use this option if you'd like to restrict access to the newly created project. In this case the project will be available only to the project administrator, the project manager and its members with corresponding rights. If you uncheck this box, the project will be available to all users who have access to the Projects module.

    It is possible to disable one of the project sections if it is a private project. To do that, go to the Team tab of your private project and hide the required sections for specific users.

  8. Check the Follow this project box, if you don't plan to participate in this project but need to keep track of it.
  9. Check the Notify Responsibles box to notify the persons who are responsible for the added milestones and tasks. If no responsibles have been assigned when adding milestones and tasks to the project structure, this option is grayed out.
  10. Click the Save button.
Create New Project Create New Project
By default, only portal owner and administrators, who have full privileges to manage the portal or Projects module, can create new projects on the portal. Administrators can also allow all the Project module users to create new projects. To enable this option, click the Settings link at the left-side panel, select the Common Settings sub-section and turn on the Any user can create a project switcher.

Making changes in your project when it is underway is as much inevitable as indispensable step in the project progress.

To adjust some project settings,

  1. open the project page clicking its title,
  2. click the Actions Icon icon to the right of the project title,
  3. select the Edit option from the drop-down list,
  4. make all the changes you need and click the Save Project button.

Managing your team

One of the key factor to your project success is your Team. When your project is underway you might need to add or remove some team members. To do that,

  1. Switch to the Team tab on the project page.
  2. Click the Manage Team link.
  3. Add new users to your team.

    To do that, check the users you wish to add to your team from the list and click the Save button. Use the filter field at the top to facilitate the search. Check the necessary group or the Select All option to add the users from the selected group or all the users respectively.

  4. Remove members from your team.

    To do that, uncheck the users you wish to remove from the list or click the Actions Icon icon to the right of the user you wish to remove and select the Remove the user from the team option.

  5. Click the Save button.
Manage Team Manage Team

By default, each project team member can view all content inside the selected project: milestones, tasks, documents, discussions and contacts.

To restrict the access just select the teammate you wish to set access rights for and click one of the links to the right:

  • Discussions - disable this option to restrict the access to the project discussions. If this option is enabled, a project member can view and comment discussions as well as start a new one.

  • Documents - disable this option to restrict the access to the project documents and files. If this option is enabled, a project member can view, load and create documents.

  • All Tasks - disable this option to restrict the access to all the project tasks. In this case the project member will be able to access tasks assigned to him/her only. If this option is enabled, a project member can view all tasks and set tasks to other teammates.

  • Milestones - disable this option to restrict the access to the project milestones. In this case the project member will be able to access milestones with tasks assigned to him/her only.

  • Contacts - disable this option to restrict the access to the CRM contacts linked with this project. If this option is enabled, a project member can view the linked contacts and the available contact information.

The same way you can set the access rights for each member of your project team unless he/she does not have projects administrator privileges.

This function is available for private projects only.

Scheduling workflow

Once the project is created, the next step is to schedule the workflow using the milestones. A milestone is a key point in the progress of a project.

To plan a new milestone,

  1. Click the Create button in the upper left corner and select the Milestone option from the drop-down list.
  2. Specify your milestone Title and enter a short Description, if necessary.
  3. Select the Project you need to add a milestone to.
  4. Select the Responsible person you wish to assign the newly created milestone to. By default, the project manager is selected.
  5. Set a desired Due Date.

    The due date of a milestone is the date by which all the tasks attached to it are supposed to be done.

    To set a due date, use one of the available options: Week, Month, Two months, or select it from the calendar, or enter it manually in the following format dd/mm/yyyy.

  6. Check the Key milestone option, if necessary.

    Use this option if you consider the newly created milestone to be more important than others. All the key milestones are marked by the red key icon placed near its title

  7. If you want to be notified 48 hours before the due date check the corresponding option.
  8. Click the Save button.
Schedule Workflow Schedule Workflow

The created milestone will be added to the Milestones list. The same way as many milestones as you wish can be added to your project.

When all the task are done, you can close the milestone changing its status from Open to Closed in the Milestones list. All you need is to click the arrow Blue Arrow to the left of the milestone title and select the necessary status from the list.

If you need to shift a milestone,

  1. select the milestone you need from the Milestones list,
  2. click the Actions Icon icon to the right of the milestone title,
  3. select the Edit option from the Actions drop-down list,
  4. make all the changes you need and click the Save Changes button.

To delete a milestone, choose the corresponding option from the Actions drop-down list.

You can also delete several milestones at once instead of deleting them one by one. To do that, check the milestones you want to delete and press the Delete button above the milestone list.

Assigning tasks

Once the project is created and the milestone is added, one more step is left. Distribute the tasks among the project team members.

To add a task,

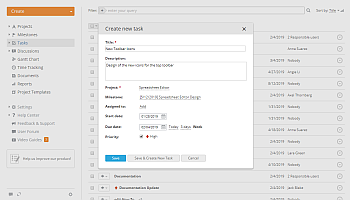
  1. Click the Create button in the upper left corner and select the Task option from the drop-down list.
  2. Specify your task Title and enter a short Description, if necessary.
  3. Select the Project you need to add a task to.
  4. Assign a task to one of the available Milestones.

    Use the none option if you don't want to attach this task to any milestone.

  5. Select the responsible person you wish to assign this task to from the Assigned to list.

    You can assign the task to as many responsible persons as you wish selecting them from the list. To remove a person added by mistake from the list of the responsible persons, hover the mouse cursor on his/her name and click the Delete icon - recycle bin icon which appears to the left. All the responsible persons will be informed about a new task assigned to them by email.

  6. Set a desired Start Date selecting it from the calendar, or entering it manually in the following format dd/mm/yyyy.
  7. Set a desired Due Date using one of the available options: Today, 3 days, Week, or selecting it from the calendar, or entering it manually in the following format dd/mm/yyyy.
  8. Check the High option to set the task priority.

    The High Priority icon - Flash icon will be added next to the task title in the Tasks list.

  9. Click the Save button or use the Save & Create New Task button to save this task and start creating the new one right away.
Assign Tasks Assign Tasks

The created task will be added to the Tasks list. The same way as many tasks as you wish can be added to your project.

If a task does not have a due date but belongs to a milestone, this task in the list is marked with the Task within Milestone Icon icon and is displayed with the milestone due date.

To quickly create a new task on the base of the existing one with all its contents, such as attached documents and subtasks, make use of the Copy feature. You'll be able to create an exact task duplicate or make some minor corrections to it (e.g. select another milestone, responsible person or due date); create similar tasks within the same project or move task copies to another project.

  1. select the task you need from the Tasks list,
  2. click the Actions Icon icon to the right of the task title,
  3. select the Copy option from the Actions drop-down list,
  4. change the task details, if necessary,
  5. choose which items you want to be copied checking the Documents and/or Subtasks box,
  6. click the Copy button to duplicate the task or use the Replace button to remove the original task and add the copied one instead of it.

If you need to edit a task,

  1. select the task you need from the Tasks list,
  2. click the Actions Icon icon to the right of the task title,
  3. select the Edit option from the Actions drop-down list,
  4. make all the changes you need and click the Save Changes button.

You can attach documents to your task. Open the task page and switch to the Documents tab on the top. Here you can:

  • create a new document, spreadsheet or presentation clicking the New file link and selecting the file type from the list;
  • upload some documents from your hard disk drive clicking the Upload file link;
  • attach files from the project that your task belongs to.

To manage documents attached to your task, place the mouse cursor over the attached document and use corresponding icons to perform the necessary action:

  • open an existing document with the Online Editor clicking the Edit document icon icon;
  • download an existing document to your hard disk drive clicking the Download document icon icon;
  • delete an existing document clicking the Delete document icon icon.
You can also quickly move several tasks at once from one milestone to another. To do that, check the tasks that belong to the same milestone and press the Move button above the task list. In the confirmation window, select a different milestone and press the Move to milestone button.

When the task is done, close it right in the Tasks list changing its status from Open to Closed. To do that, just click the arrow Blue Arrow to the left of the task title and select the necessary status from the list.

If some additional task statuses have been previously created by a full access or the 'Projects' module administrator, it's also possible to assign custom statuses to your tasks. To learn more on how to create and apply custom task statuses, you can refer to this article.

You can also change the status for several tasks at once instead of changing statuses one by one. To do that, check the necessary tasks, press the Change Status button above the task list and select the necessary status.

To delete a task, choose the corresponding option from the Actions drop-down list.

You can also delete several tasks at once instead of deleting them one by one. To do that, check the tasks you want to delete and press the Delete button above the task list.

Creating subtasks

Sometimes to complete a task you need to perform several steps or divide it into parts and distribute them among several persons. Creating subtasks will help you manage your to-do list and stay organized.

To create a subtask,

  1. Open the Tasks list clicking the corresponding option on the left side panel.
  2. Select a desired task.

    To find a necessary task make use of our filter at the top of the list. Click the Add Filter button and select one of the options:

    • use the RESPONSIBLE list to display the tasks assigned to you, to a certain user or a group, or the tasks with no responsible;

    • use the CREATOR list to display the tasks created by you, or by a certain user;

    • use the PROJECT list to display the tasks within your projects, or the projects you don't participate in, or the projects with a specified tag, or the projects without tags;

    • use the MILESTONE list to display all the tasks of the milestones with at least one task assigned to you, or tasks without milestones, or the ones assigned to a specified milestone;

    • use the STATUS list to display the tasks you are working on (open) or you have already completed (closed);

    • use the DUE DATE list to display the tasks with a specified due date;

    You can also enter a task name, entirely or partially, in the field and press the Enter key to find the necessary one.

  3. Hover the cursor over the selected task and click the Subtask link which appears to the right of the task title.
  4. Specify your subtask Title.
  5. Select the responsible person you wish to assign this subtask to from the Responsible list.
  6. Click the OK button to the right.
Create Subtasks Create Subtasks

The created subtask will be added and displayed below the selected task. The subtask due date will coincide with the due date of the task you attached the subtask to and can NOT be altered.

You can continue adding subtasks right now using the field below or create other subtasks later using the Add subtask option in the Actions menu to the right of the task title.

To quickly duplicate an existing subtask within the same task, click the Actions Icon icon to the right of the subtask title and select the Copy option from the Actions drop-down list. The copied subtask will be added and displayed below the original one.

If the task has changed and you need to move the subtask to another task, you can use the Drag&Drop function. To do this, hold the necessary subtask and manually drag it into another task.

If you need to edit a subtask,

  1. select the subtask you need from the list,
  2. click the Actions Icon icon to the right of the subtask title,
  3. select the Edit option from the Actions drop-down list,
  4. make all the changes you need and click the OK button.

When the subtask is completed, close it checking the box to the left of its title.

To delete a subtask, choose the corresponding option from the Actions drop-down list.

Using Gantt chart

Gantt Chart is a bar chart used to illustrate a project schedule and dependency relationships between tasks.

The most simple way to open the Gantt Chart is to click the Gantt Chart link on the left side panel.

Alternatively, you can open the Gantt Chart proceeding in one of the following ways:

  1. Select your project from the Projects list.

    To find a necessary one make use of our filter at the top of the list clicking the Add Filter button and selecting one of the options:

    • use the STATUS list to display the projects you are working on (Active), you have temporarily suspended the work on (Paused) or you have already completed (Closed);

    • use the PROJECT MANAGER list to display the projects managed by you or by a certain user;

    • use the TEAM MEMBER list to display the projects you or a certain user or group participate in;

    • use the OTHER list to display the projects you don't participate in but keep track of (Followed), or the projects with a specified tag, or the projects without tags;

    You can also enter a project title, entirely or partially, in the field and press the Enter key to find the necessary one.

  2. Open the project page clicking its title.
  3. Switch to the Gantt Chart tab on the project page.

OR

  1. select a desired task from the Tasks list using the filter above,
  2. open the task page clicking its title,
  3. scroll down to the Related Tasks section,
  4. click the Move to Gantt Chart link.

The Gantt Chart will be opened:

Using Gantt Chart Using Gantt Chart

Here you can:

  • select one or several projects you wish to view the Gantt Chart for,
  • choose the activity details to display on the left side panel: responsible, start date, end date, status, priority,
  • get a panoramic view of all the project activities,
  • visually judge the project activity status: open/closed, active/overdue,
  • manage the project milestones and tasks: create, edit, close, reopen, delete etc,
  • link the tasks within your project to create the task dependencies.

To learn more, refer to our User Guide.

Leading discussion

Once the project is underway any sort of problems or outstanding questions may occur. To find a right solution, discuss the issue with your project team.

To start a project-related discussion,

  1. Open the Project you wish to add a discussion to.
  2. Click the Create button in the upper left corner and select the Discussion option from the drop-down list.
  3. Specify your discussion Title.
  4. Type in your message and edit it using the Formatting Toolbar.
  5. Use the Text Cut button to select a part you wish to be shown on the Discussions page.

    To do that, select the part you wish to hide with the mouse and click the Text Cut button. The selected part will be highlighted. In this way only a short snippet of the post (not selected) was shown at the discussion list and feed pages.

  6. Invite people to your discussion.

    All the project team members will be invited to the discussion automatically and listed below the discussion text field. If you need to remove some of them or invite the persons who don't take part in the project click the Manage Subscribers link.

    • To invite some more people,
      Сheck the users you wish to invite to your discussion and click the Save button. You can add users from a particular group or all the portal users checking the corresponding option on the right side of the window.
    • To remove a subscriber,
      Place the mouse cursor over the needed user and click the Delete member icon icon.

    The people you've selected will be informed about the discussion created and the comments added to it.

  7. add documents to the discussion:
    • create a new document, spreadsheet or presentation clicking the New file link and selecting the file type from the list;
    • upload some documents from your hard disk drive clicking the Upload file link;
    • attach files from the project that your discussion belongs to.
  8. Preview the result and save your discussion.
Lead Discussion Lead Discussion

You can always edit the text of your discussion, manage its subscribers and attached documents. To do that,

  1. select your discussion from the Discussions list,
  2. open the discussion page clicking its title (the Comments tab opens by default),
  3. click the Actions Icon icon to the right of the discussion title,
  4. select the Edit option from the Actions drop-down list,
  5. make all the changes you need and click the Save Changes button.

If you need to notify a project member in the Comments section, you can use the Mention option. To do this, enter the '@' sign into the textfield. A list of other project members opens. Select the necessary person and click on it. The corresponding email address (specified in the profile) of the user will be automatically added into the comment as a link. Once the comment is posted, the mentioned user will be notified via chat, mail, and telegram.

To manage documents attached to your discussion, open the discussion page and switch to the Documents tab on the top. Place the mouse cursor over the attached document and use corresponding icons to perform the necessary action:

  • open an existing document with the Online Editor clicking the Edit document icon icon;
  • download an existing document to your hard disk drive clicking the Download document icon icon;
  • delete an existing document clicking the Delete document icon icon.

It’s also possible to create a task on the base of the discussion. Open the discussion page, click the Actions Icon icon next to the discussion title and use the Create task on discussion option from the menu.

To delete a discussion, choose the corresponding option from the Actions drop-down list.

If your discussion is no longer relevant, but you don't want to delete it because it contains some important information, use the Archive option in the drop-down list on the discussion page. All the discussion members will have an access to the discussion and all the files attached but won't be able to add new comments to it. If you want to resume the discussion, click the Actions Icon icon and choose the Open option.

Reporting project progress

To increase the chances for project success, once your project is created you need to constantly monitor its progress keeping up with what everyone is doing.

To do that, make use of the online office Reports system:

  1. open the Reports list clicking the corresponding link on the left-side panel,
  2. select the needed report type on the left and configure report parameters on the right. To learn more about report types and their settings, please, visit this page.
  3. click the Generate Report button.
Report Project Progress Report Project Progress

Once the report is generated, click the Open link at the bottom right corner to view the report. The file will open in the Spreadsheet Editor and you will be able to edit it, print or download if necessary.

  • To print the report, click the Print icon Print icon at the top toolbar.
  • To download the report, switch to the File tab at the top toolbar, select the Download as... option at the left sidebar and choose the necessary file format.
Project Reports Project Reports

All the generated reports can be found in the Generated Reports list (they are only accessible to the user who generated them). To manage your reports, move the mouse cursor over the necessary report in the list and use the icons next to the file:

  • Edit report icon - to open the report using the Spreadsheet Editor.
  • Download report icon - to download the report as the .xlsx file.
  • Delete report icon - to delete the report.
Generated Reports Generated Reports

By default, all the generated reports are stored in the My Documents section of the Documents module. You can choose a certain folder to store project reports. To do that,

  1. click the Settings link at the left-side panel,
  2. select the Common Settings sub-section,
  3. in the Personal Settings section, click the Choose button next to the Report Folder field,
  4. select one of the existing folders within the My Documents section and click the OK button.
You can set up needed parameters once and regularly receive automatic reports by email on certain date and time. To learn how it can be done refer to this article.

Suspending/closing/deleting project

If you no longer work on your project, you may choose to either suspend or close it changing its status.

All the project milestones and tasks should not necessarily be closed for you to be able to pause it, but you cannot close a project with the open tasks.

To do that,

  1. select your project from the Projects list using the filter above.
  2. click the arrow Blue Arrow to the left of the project title.
  3. select an appropriate status from the drop-down list.

The paused or closed project will be faded and moved to the end of the Projects list. But you can easily access its milestones and tasks and change its status back to Active anytime.

Change Project Status Change Project Status

If you wish to delete your project permanently,

  1. select your project from the Projects list,
  2. open the project page clicking its title,
  3. click the Actions Icon icon to the right of the project title,
  4. select the Delete option from the drop-down list,
  5. confirm the operation.

It's also possible to delete several projects at once. To do that check the projects you want to delete in the list and press the Delete button above the project list.

If you decide to delete a project, keep in mind that the project with all its tasks, milestones, files, discussions etc. will be lost with no possibility to restore.

Changing Projects module settings

By default, all portal users can access the Projects module. There are 5 different access levels inside it: guest (an external user with view-only permissions), user (a portal user not participating in any project), project team member, project manager and project administrator.

Being a guest you may perform the following operations:

  • view projects available to all portal members or private ones (where he is a project team member);
  • add comments and subscribe to tasks and discussions belonging to projects he/she can access.

Being a user you may perform the following operations:

  • view all content (except private projects);
  • add comments in discussions;
  • follow necessary projects;
  • select a start page in the Projects module;
  • select a folder to store project reports.

To select a start page,

  1. click the Settings link at the left-side panel,
  2. select the Common Settings sub-section,
  3. In the Personal Settings section, select the necessary start page from the list. The following options are available: Tasks, Projects, Discussions and Time Tracking. By default, the Tasks option is selected.

Being a project team member you may perform the following operations:

  • perform all user operations;
  • add tasks and assign them to yourself or other team members;
  • manage tasks created by you/assigned to you;
  • start new discussions;
  • add/remove your own files.

Being a project manager you may perform the following operations:

  • perform team member operations;
  • add/remove people from project team;
  • manage tasks, milestones, discussions, comments inside a project;
  • change project status;
  • edit project settings;
  • set access rights to project team members (for private project only).

Being a project administrator you may perform the following operations:

  • perform project manager operations;
  • create/edit/delete projects;
  • assign project manager;
  • create and edit project templates;
  • fully manage all content across all projects (manage team, tasks, milestones etc.);
  • adjust common settings for the Projects module.

To change common settings of the Projects module,

  1. click the Settings link at the left-side panel,
  2. select the Common Settings sub-section,
  3. set necessary options:
    • Any user can create a project - by default, this option is disabled. Turn on the switcher if you want to allow all users to create new projects.
    • Hide Entities In Paused Projects - by default, this option is enabled. Turn off the switcher if you want to display entities of the paused projects.

But being a portal owner/full access administrator you can restrict access to the Projects for some users or even disable this module, if you don't need it at all.

To restrict access to the Projects module,

  1. click the Settings link at the left-side panel,
  2. select the Portal Access Rights sub-section,
  3. go to Projects section,
  4. check the Users from list radio button,
  5. select the users you wish to grant access to,

    To do that, use one of the available options;

    • use the Add user link if you wish to grant access to one or more people;
    • use the Add group link if you wish to grant access to all portal users, or to one or more groups.

To disable the Projects module just switch to the Modules & Tools section selecting the corresponding option on the left-side panel, uncheck the Projects module and click the Save button.

Change Projects Module Settings Change Projects Module Settings
Try now for free Try and make your decision No need to install anything
to see all the features in action
You Might Also Like This:
Close