Artículos con :
Cerrar
Changelog
Cerrar
Pruébelo en la nube
Centro de ayuda
integración

About the ONLYOFFICE and Odoo integration

Odoo is a business management tool designed for resource planning. ONLYOFFICE offers three official modules to integrate it with Odoo:

  1. ONLYOFFICE is a main module that is required for other modules to work and allows attaching documents.
  2. ONLYOFFICE Documents is a module used for creating, editing, and attaching documents.
  3. ONLYOFFICE Templates is a module used for creating and editing fillable forms.
To learn more about how it works and how to compile the ONLYOFFICE connector for Odoo, please visit our API documentation.

Main features

  • Editing and viewing text documents, spreadsheets, and presentations.
  • Open other office file formats for viewing, including RTF, TXT, CSV, etc.
  • Co-editing documents in real-time: two co-editing modes (Fast and Strict), the Track Changes mode, comments, and the built-in chat.
  • Create and edit form templates.
  • Read PDF files.
  • JWT support to secure your traffic so that no one can have access to your documents except for the users with proper rights.

Supported formats

  • For editing: DOCX, XLSX, PPTX.
  • For viewing only: DJVU, DOC, DOCM, DOT, DOTM, DOTX, EPUB, FB2, FODT, HTML, MHT, ODT, OTT, OXPS, PDF, RTF, TXT, XPS, XML, CSV, FODS, ODS, OTS, XLS, XLSM, XLT, XLTM, XLTX, FODP, ODP, OTP, POT, POTM, POTX, PPS, PPSM, PPSX, PPT, PPTM.

Connecting ONLYOFFICE Docs to Odoo

Requirements

  • ONLYOFFICE Docs instance. Please refer to the official documentation page to learn more about installing ONLYOFFICE Docs:
  • ONLYOFFICE main module that is required for other modules to work. The module has no paid license.
  • ONLYOFFICE Documents module that requires Odoo Enterprise Edition to work properly. This module will automatically install the main ONLYOFFICE module.
  • ONLYOFFICE Templates module that requires ONLYOFFICE license with Automation API to work properly. This module will automatically install the main ONLYOFFICE module.
  • PyJWT is required for all modules.

Installing PyJWT library

To install PyJWT library, enter the following command in the command line:

pip install pyjwt

To learn more, please refer to the official PyJWT Installation guide.

Configuring the ONLYOFFICE integration module for Odoo

ONLYOFFICE module

To install the ONLYOFFICE module:

  1. Open the Apps section.
  2. Find ONLYOFFICE and click the Activate button below.
ONLYOFFICE Documents

To install the ONLYOFFICE Documents module:

  1. Open the Apps section.
  2. Find ONLYOFFICE Documents and click the Activate button below.
ONLYOFFICE Templates

To install the ONLYOFFICE Templates module:

  1. Open the Apps section.
  2. Find ONLYOFFICE Templates and click the Activate button below.

The first installed module automatically establishes a connection to the Document Server.

After the modules' installation, adjust the settings within your Odoo if necessary. To do that, go to Home menu -> Settings -> ONLYOFFICE.

In the Document Server Url, specify the URL of the installed ONLYOFFICE Docs or the address of ONLYOFFICE Docs Cloud. To learn more about JWT configuration, please refer to the corresponding section of this guide.

Server address for internal requests from the Document Editing Service - the field is filled automatically.

Document Editing Service address for internal requests from the server - this field should have the same value as the Document Server Url.

If needed, you can connect to ONLYOFFICE demo server by activating the Connect to demo ONLYOFFICE Docs server checkbox. Please note that this is a public test server, and no sensitive data should be uploaded or processed there.

Configuring JWT for the ONLYOFFICE and Odoo integration

JWT or JSON Web Token is a string sent from client to server within the HTTP request to validate the authenticity of the client. JWT is saved on the client-side only, so the transmission between parties is protected and digitally signed.

The token is generated using the JWT (JSON Web Tokens) standard. The tokens are signed by the server's key, so the client is able to verify that the token is legitimate.

ONLYOFFICE Docs validates the token. The data from the payload is considered valid and is used instead of the corresponding data from the main parameters. If the token is invalid, the command is not executed. To learn more, please read the API Security guide.

In Odoo, JWT is enabled by default.

Follow these steps to configure it manually if needed:

  1. Go to Home menu -> Settings -> ONLYOFFICE.
    ONLYOFFICE_Odoo ONLYOFFICE_Odoo
  2. Enter the values in the following fields:
    • Document Server JWT Secret: The secret key is generated automatically to restrict the access to ONLYOFFICE Docs. If you want to specify your own secret key in this field, also specify the same secret key in the ONLYOFFICE Docs config file to enable the validation.
    • Document Server JWT Header: Standard JWT header used in ONLYOFFICE is Authorization. In case this header is in conflict with your setup, you can change the header to the custom one.

Start using ONLYOFFICE Docs within Odoo

ONLYOFFICE module

To attach a file:

  1. Go to the Discussion module.
  2. Choose a channel or a discussion.
  3. Click the Attach files button in the chat field.
  4. Select the file you need to attach and click OK.
  5. The attached file will look like this:
    ONLYOFFICE_Odoo ONLYOFFICE_Odoo
ONLYOFFICE Documents module

To create a file:

  1. Open the Documents module.
  2. Click the Create with ONLYOFFICE button in the Upload dropdown menu on the top panel.
  3. Enter the file name in the Title field if necessary.
  4. Choose one of the available file types: Document, Spreadsheet, or Presentation.
  5. Click the Create button.
    ONLYOFFICE_Odoo ONLYOFFICE_Odoo

You can edit any files attached to Odoo activities and supported by ONLYOFFICE (see the full list here).

To edit or view a file, click the Open in ONLYOFFICE button next to it, for example:

ONLYOFFICE_Odoo ONLYOFFICE_Odoo
ONLYOFFICE Templates module

You can use a premade template available on the main page of the module.

ONLYOFFICE_Odoo ONLYOFFICE_Odoo
Please note that the number of templates available depends on the installed modules, i.e., Sales, Invoicing, Calendar, Recruitment, etc. ONLYOFFICE demo templates will only be added to the Odoo modules that are already installed. It is strongly recommended to install ONLYOFFICE Templates after installing other Odoo modules.

To create a form:

  1. It is recommended to switch to the developer mode.
    • Go to the Settings.
    • Open the General Settings tab.
    • Scroll to the Developer tools.
    • Click the Activate the developer mode menu option.
  2. Open the Home Menu and choose the ONLYOFFICE Templates option.
  3. Click the Create or upload button to create a new form.
  4. Enter the Template Name.
  5. Enter the Odoo model in the Select Model field.
    ONLYOFFICE_Odoo ONLYOFFICE_Odoo
    • To learn the model name, open the required module.
    • Go to any entry that has an ONLYOFFICE Send & Print button.
    • Look at the page URL. The model-xxx is the name of the Odoo model that you need for the Select Model field. Paste it into this field and press Enter.
      ONLYOFFICE_Odoo ONLYOFFICE_Odoo
    • You can also upload en existing template by clicking the Upload your file button.
  6. The template should be created and available for editing. If not, click the Save manually button in the top left corner of the screen when creating a template.

    If you need to create multiple templates, fill in the required fields and click the New button in the top right corner of the screen. The current template will be saved, the fields will once again be empty, and you can proceed with creating another template.

  7. Working with the template fields
    Switch to the ONLYOFFICE Templates module and click the required template to open it for further editing. If you need to edit the properties of the template, click the More button in top right corner of the required module and choose the Edit option.
  8. Each field in each module has a question mark beside it. The information there is necessary for filling in the fields.
    ONLYOFFICE_Odoo ONLYOFFICE_Odoo

    If a field does not have a question mark, try to temporarily delete its contents. The field name might appear instead. These kinds of names can also be found in the root section on the left panel while editing a form.

  9. Searching in the ONLYOFFICE Templates connector requires information from the fields Field and Module.
  10. If a field has a one2many/many2many/many2one relation, the subsection will have a corresponding name.
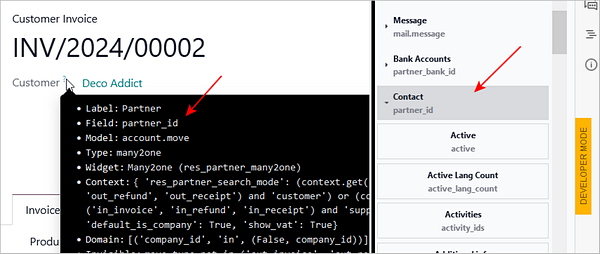
    Subsection name

  11. If the Model field contains a name that does not coincide with the one given in the URL (e.g., model-account.move in the URL and account.move.line in the Model field), look for it in the subsection.

    If it is a one2many/many2many/many2one relation, the subsection key will have the same name as the Field field. For example, if it is a partner_id, the key will have the same name.

  12. Please note that if the field’s model does not coincide with the one in the URL, the section key will have the same name as the Model field.
  13. Since the connector is integrated within all Odoo modules, it's possible to print a filled out form in the Action menu > Print with ONLYOFFICE.
  14. All available templates for the selected module will be displayed in the opened menu. Choose the required template to fill it with the data corresponding with the selected module item.
  15. The form will be downloaded to your device. The fields are filled out automatically depending on the page you downloaded the form from.
  16. To add a dataset to a form,
    • create a table in the form that will have the same columns as the fields’ names of the dataset;
    • enter the information given in the Odoo question marks into the corresponding fields;
    • the rest of the table will be filled up automatically during the page printing.

      As of yet, no HTML elements can be inserted into a form.

  17. To manage access rights,
    • go to the user profile;
    • choose whether they are a User or an Administrator:
      • User can only print and view templates.
      • Administrator can create, edit, view, delete, and print templates.
    • all users have the User access right by default.
Download Best editors on your website Let your site users view, edit and collaborate
on all types of text, spreadsheet and presentation files
También le podría gustar:
Cerrar