Insert images
Spreadsheet Editor allows you to insert images in the most popular formats into your worksheet. The following image formats are supported: BMP, GIF, JPEG, JPG, PNG.
Insert an image
To insert an image into the spreadsheet,
- place the cursor where you want the image to be put,
- switch to the Insert tab of the top toolbar,
- click the Image icon at the top toolbar,
-
select one of the following options to load the image:
- the Image from File option will open the standard dialog window for file selection. Browse your computer hard disk drive for the necessary file and click the Open button
- the Image from URL option will open the window where you can enter the necessary image web address and click the OK button
- the Image from Storage option will open the Select data source window. Select an image stored on your portal and click the OK button
After that the image will be added to the worksheet.
Adjust the image settings
Once the image is added you can change its size and position.
To specify exact image dimensions:
- select the image you wish to resize with the mouse,
-
click the Image settings icon at the right sidebar,
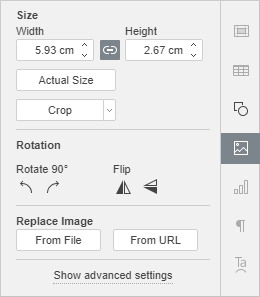
- in the Size section, set the necessary Width and Height values. If the Constant proportions button is clicked (in this case it looks like this ), the width and height will be changed together preserving the original image aspect ratio. To restore the actual size of the added image, click the Actual Size button.
To crop the image:
Click the Crop button to activate cropping handles which appear on the image corners and in the center of each its side. Manually drag the handles to set the cropping area. You can move the mouse cursor over the cropping area border so that it turns into the icon and drag the area.
- To crop a single side, drag the handle located in the center of this side.
- To simultaneously crop two adjacent sides, drag one of the corner handles.
- To equally crop two opposite sides of the image, hold down the Ctrl key when dragging the handle in the center of one of these sides.
- To equally crop all sides of the image, hold down the Ctrl key when dragging any of the corner handles.
When the cropping area is specified, click the Crop button once again, or press the Esc key, or click anywhere outside of the cropping area to apply the changes.
After the cropping area is selected, it's also possible to use the Fill and Fit options available from the Crop drop-down menu. Click the Crop button once again and select the option you need:
- If you select the Fill option, the central part of the original image will be preserved and used to fill the selected cropping area, while other parts of the image will be removed.
- If you select the Fit option, the image will be resized so that it fits the cropping area height or width. No parts of the original image will be removed, but empty spaces may appear within the selected cropping area.
To rotate the image:
- select the image you wish to rotate with the mouse,
- click the Image settings icon at the right sidebar,
-
in the Rotation section click one of the buttons:
- to rotate the image by 90 degrees counterclockwise
- to rotate the image by 90 degrees clockwise
- to flip the image horizontally (left to right)
- to flip the image vertically (upside down)
Note: alternatively, you can right-click the image and use the Rotate option from the contextual menu.
To replace the inserted image,
- select the image you wish to replace with the mouse,
- click the Image settings icon at the right sidebar,
-
in the Replace Image section click the button you need: From File or From URL and select the desired image.
Note: alternatively, you can right-click the image and use the Replace image option from the contextual menu.
The selected image will be replaced.
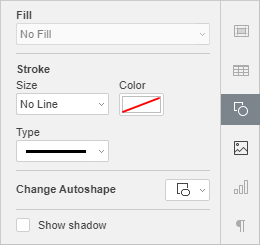
When the image is selected, the Shape settings icon is also available on the right. You can click this icon to open the Shape settings tab at the right sidebar and adjust the shape Stroke type, size and color as well as change the shape type selecting another shape from the Change Autoshape menu. The shape of the image will change correspondingly.
At the Shape Settings tab, you can also use the Show shadow option to add a shadow to the image.
Adjust the image advanced settings
To change its advanced settings, click the image with the right mouse button and select the Image Advanced Settings option from the right-click menu or just click the Show advanced settings link at the right sidebar. The image properties window will open:
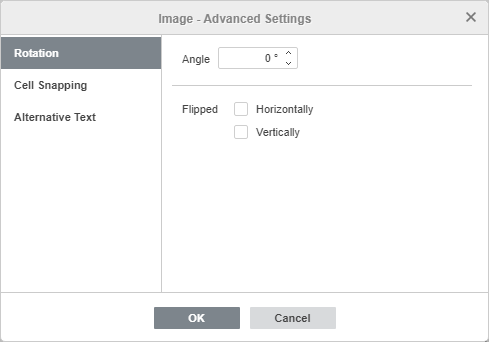
The Rotation tab contains the following parameters:
- Angle - use this option to rotate the image by an exactly specified angle. Enter the necessary value measured in degrees into the field or adjust it using the arrows on the right.
- Flipped - check the Horizontally box to flip the image horizontally (left to right) or check the Vertically box to flip the image vertically (upside down).
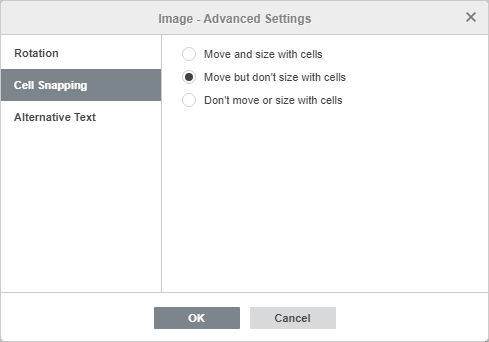
The Cell Snapping tab contains the following parameters:
- Move and size with cells - this option allows to snap the image to the cell behind it. If the cell moves (e.g. if you insert or delete some rows/columns), the image will be moved together with the cell. If you increase or decrease the width or height of the cell, the image will change its size as well.
- Move but don't size with cells - this option allows to snap the image to the cell behind it preventing the image from being resized. If the cell moves, the image will be moved together with the cell, but if you change the cell size, the image dimensions remain unchanged.
- Don't move or size with cells - this option allows to prevent the image from being moved or resized if the cell position or size was changed.
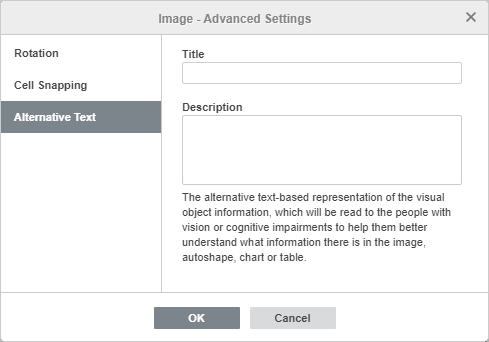
The Alternative Text tab allows to specify a Title and Description which will be read to the people with vision or cognitive impairments to help them better understand what information there is in the image.
To delete the inserted image, click it and press the Delete key.
Alla pagina precedente