Start using ONLYOFFICE Docs within Odoo
ONLYOFFICE module
To attach a file:
- Go to the Discussion module.
- Choose a channel or a discussion.
- Click the Attach files button in the chat field.
- Select the file you need to attach and click OK.
-
The attached file will look like this:
ONLYOFFICE Documents module
To create a file:
- Open the Documents module.
- Click the Create with ONLYOFFICE button in the Upload dropdown menu on the top panel.
- Enter the file name in the Title field if necessary.
- Choose one of the available file types: Document, Spreadsheet, or Presentation.
-
Click the Create button.
You can edit any files attached to Odoo activities and supported by ONLYOFFICE (see the full list here).
To edit or view a file, click the Open in ONLYOFFICE button next to it, for example:
ONLYOFFICE Templates module
You can use a premade template available on the main page of the module.
Please note that the number of templates available depends on the installed modules, i.e.,
Sales, Invoicing, Calendar, Recruitment, etc. ONLYOFFICE demo templates
will only be added to the Odoo modules that are already installed. It is strongly recommended to install
ONLYOFFICE Templates after installing other Odoo modules.
To create a form:
-
It is recommended to switch to the developer mode.
- Go to the Settings.
- Open the General Settings tab.
- Scroll to the Developer tools.
- Click the Activate the developer mode menu option.
- Open the Home Menu and choose the ONLYOFFICE Templates option.
- Click the Create or upload button to create a new form.
- Enter the Template Name.
- Enter the Odoo model in the Select Model field.
- To learn the model name, open the required module.
- Go to any entry that has an ONLYOFFICE Send & Print button.
-
Look at the page URL. The
model-xxx is the name of the Odoo model that you need for the Select Model field. Paste it into this field and press Enter.
- You can also upload en existing template by clicking the Upload your file button.
-
The template should be created and available for editing. If not, click the Save manually button in the top left corner of the screen when creating a template.
If you need to create multiple templates, fill in the required fields and click the New button in the top right corner of the screen. The current template will be saved, the fields will once again be empty, and you can proceed with creating another template.
-
Working with the template fields
Switch to the ONLYOFFICE Templates module and click the required template to open it for further editing. If you need to edit the properties of the template, click the More button in top right corner of the required module and choose the Edit option.
-
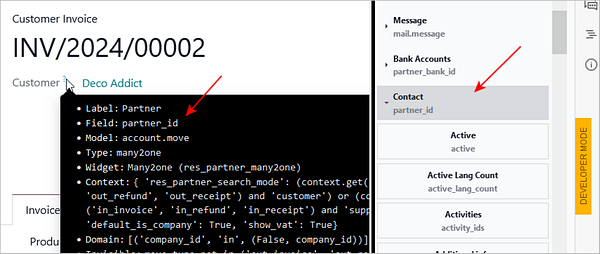
Each field in each module has a question mark beside it. The information there is necessary for filling in the fields.
If a field does not have a question mark, try to temporarily delete its contents. The field name might appear instead. These kinds of names can also be found in the root section on the left panel while editing a form.
- Searching in the ONLYOFFICE Templates connector requires information from the fields Field and Module.
-
If a field has a one2many/many2many/many2one relation, the subsection will have a corresponding name.

-
If the Model field contains a name that does not coincide with the one given in the URL (e.g.,
model-account.move in the URL and account.move.line in the Model field), look for it in the subsection.
If it is a one2many/many2many/many2one relation, the subsection key will have the same name as the Field field. For example, if it is a partner_id, the key will have the same name.
- Please note that if the field’s model does not coincide with the one in the URL, the section key will have the same name as the Model field.
-
Since the connector is integrated within all Odoo modules, it's possible to print a filled out form in
the Action menu > Print with ONLYOFFICE.
-
All available templates for the selected module will be displayed in the opened menu. Choose the
required template to fill it with the data corresponding with the selected module item.
-
The form will be downloaded to your device. The fields are filled out automatically depending on the
page you downloaded the form from.
-
To add a dataset to a form,
- To manage access rights,
- go to the user profile;
-
choose whether they are a User or an Administrator:
- User can only print and view templates.
- Administrator can create, edit, view, delete, and print templates.
- all users have the User access right by default.