A room is the main structural unit of ONLYOFFICE DocSpace. It’s a space where you can store documents which are necessary for performing a certain collaborative task, for example, filling in questionnaires and applications, co-authoring articles, sending files for review, or demonstrating ready documents.
For example, the Collaboration room allows co-authoring multiple articles. In this room, admins add documents and invite editors who can co-edit the files. It’s also possible to invite viewers who can only view docs.
Users and guests can see only the rooms they are invited to. Admins can create new rooms and manage the existing ones, add documents to the room, invite users assigning permission levels to them, and manage users.
To create a new room,
- Go to the Rooms section on the left.
- Use the New room button in the upper left corner or the
 Plus icon above the list of rooms.
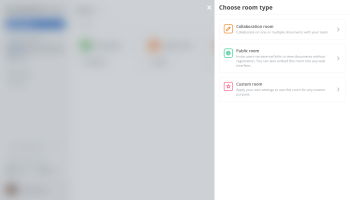
- Select the room type. Each room type comprises different user permission levels which can be assigned to its members:
- Public room – for inviting users via external links to view documents without registration. You can also embed this room into any web interface. The available user permission levels are Room manager, Content creator.
- Form filling room allows you to upload PDF forms into the room, invite users to fill out a PDF form, review completed forms and analyze data automatically collected in a spreadsheet. The available user permission levels are Room manager, Content creator, Form filler.
- Collaboration room – for co-editing documents, spreadsheets, presentations. The available user permission levels are Room manager, Content creator, Editor, Viewer.
- Virtual Data Room - for using advanced file security options: set watermarks, automatically index and track all content, restrict downloading and copying. The available user permission levels are Room manager, Content creator, Editor, Viewer.
- Custom room – for using different access rights. The available user permission levels are Room manager, Content creator, Editor, Form filler, Reviewer, Commentator, Viewer.

- Enter the room name.
- Click the plus icon and choose one of the options to personalize the room cover:
- Upload picture - to select an image stored on your computer.
- Customize cover - to select a color and an icon from the predefined set. You can also choose a custom color using the palette. If you apply the Without icon option, the first letter of the first word and the first letter of the last word of the room name will be displayed on the cover.
- Add new tags or select the existing ones to classify the rooms by category, purpose, task, etc.
- If the storage quota is enabled in the DocSpace settings, you can change the quota or disable the quota for this room.
- For a public room, you can use third-party services as data storage.
such services as Dropbox, Box, OneDrive must be previously connected in the DocSpace settings. You can also use Nextcloud, ownCloud, kDrive, or another WebDav service. When clicking on a non-activated storage, the Integration page with a modal window for activating a third-party service will open.
- Turn on the Third-party storage switcher.
- Select the necessary service from the list and click Connect.
- In a new window, specify the connection URL, your login and password, and click Save.
- A new folder for storing this room’s data will be created in the connected storage. If necessary, uncheck this option and select the already existing folder in the connected storage.
- Click Create.
- Within the created room, upload or create documents and invite users assigning corresponding permission levels to them to start collaboration. For more details on room management, please refer to this article.
It's also possible to create a new room on the base of the selected documents/folders from the Documents section.
Select the necessary files/folders and use the Create room option that appears on the top toolbar or the same option from the file context menu. After creating the room, the selected files/folders will be copied to the created room.