Available access types
Using the mobile web version, you can share a file/folder with your portal users/groups or provide access to a file for anyone else by sharing a link to a document. The following access types can be selected:
Share files and folders with portal users
To share your file/folder with other users on your portal:
- open the Sharing Settings window:
- touch the
 Share button to the right of the necessary document/folder in the file list, or
- touch the
 icon and select the Sharing Settings option from the menu.
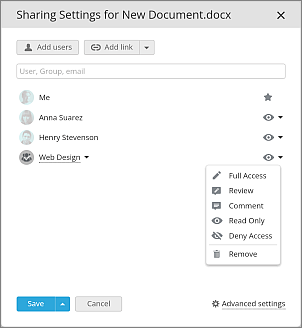
The Sharing Settings window displays the persons who have previously been granted access to this file/folder.
- tap the Add users button to open the user/group list.
- check the persons (groups) you want to share the document with and tap the Save button.
- set a necessary access type for each particular user/group. The Read Only option is selected by default. Tap the
 icon next to the user name and choose the necessary option: Full Access, Review, Form Filling, Comment, Read Only, or Deny Access. The available options may differ depending on the file type.
To remove a user/group from the list, tap on the icon near their name in the list and choose the Remove option at the toolbar above.
- you can tap Advanced settings and choose one of the two options for sharing files:
- Can’t print, download and copy file (for Read Only & Comment) – sets the corresponding restrictions for all users with ‘Read Only’ and ‘Comment’ access rights to the file.
- Can’t change sharing settings (for Full Access) - sets the corresponding restrictions for all users with ‘Full Access’ access rights to the file.
- press the Save button at the bottom of the window.
By tapping the arrow next to the Save button you can choose whether you want to:
- Add message – enter your notification message in the appeared field and tap the Save and Send button;
- Save without notification – the settings are saved but the users concerned are not notified;
- Save and Copy direct link – the settings are saved and the direct link to the file or folder is copied to your clipboard.
Share files and folders using the external link
To provide access to the file/folder via the external link specifying the necessary access type:
- open the Sharing Settings window:
- touch the Share button to the right of the necessary document/folder in the file list, or
- touch the icon and select the Sharing Settings option from the menu.
- tap the Add link button within the 'Sharing Settings' window. The New link menu item will appear in the list below,
Alternatively, you can tap the arrow to the right of the Add link button and choose the Create new external link option. Another option in this menu allows you to copy the direct link to the file or folder.
- change the link name to distinguish various links and tap the
 button,
- tap the link name and choose one of the following options:

- Copy external link – the link will be copied to your clipboard.
- Share – opens a window providing you with three options of sharing the link, i.e. via e-mail, social networks or copying the link.
- Shorten the link – get the shortened version of the link.
- Set a password – protect the link access to the file or folder by a user-customized or automatically generated password.
- Turn on the Enable password access switcher.
- tap the
 icon to generate a password or enter it manually into the corresponding field.
- To clean the password field, tap the Clean button.
- To copy the link and the password to your clipboard for future sharing, tap the Copy link and password button.
- You can disable/re-enable password access by turning the corresponding switch at the top of the window off/on.
- Tap the Save button to save the password access settings.
Please note that the password is applied to the link access and not to the file itself. To learn more about document protection, please read the following guide.
You can also use the  icon next to the link within the 'Sharing Settings' window to set a password.
- Limit by time – set the time limit during which the link stays valid.
- Turn on the Enable time limit switcher.
- Enter the needed date in the Date field or open the calendar
 and set the date there.
- Enter the required time length in the Time field.
- To clean the date and time values, tap the Clean button.
- To permanently delete the link after timeout, check the corresponding checkbox.
- Tap the Save button to save the time limit settings.
You can also use the  icon next to the link within the 'Sharing Settings' window to set a time limit.
- Rename – set a customized name for the link displayed in the ‘Sharing Settings’ window to distinguish various links to the file or folder easily.
- Delete – delete the link to the file or folder. The file/folder will become inaccessible through the previously shared link.
- select the necessary access type. Tap the icon and select the necessary access type from the drop-down list
- To save the changes made to the external link parameters, tap the Save button. To save the changes and get the link copied to your clipboard, tap the arrow next to the Save button and choose the Save and Copy direct link option.