The Documents app for Android allows you to access the files stored in your ONLYOFFICE account on your mobile device. Using this app, you can view, create and edit text documents, spreadsheets and presentations, open and fill out DOCXF form templates and OFORM fillable forms, manage your documents as well as connect third-party cloud storages. You can provide different access types to your files and edit documents collaboratively with other portal users or share files via external links.
It's also possible to create new, view, edit, and manage files stored on your device in addition to connecting third-party cloud services which support WebDAV protocol.
Supported devices
The application runs under Android 6.0 or higher.
First launch
The Documents app is available on Google Play, Huawei AppGallery, Xiaomi GetApps, and Galaxy Store. After you've downloaded and installed the application on your mobile device, tap the
 icon to launch it.
Application sections
The Documents app contains four main sections which are available at the bottom panel.

 Recent section contains the files you have recently opened both on the portal and on the device.
 Clouds section allows you to connect your existing ONLYOFFICE cloud or create a new one and work on the files stored on your portal in online mode. Using this section you can also connect third-party clouds, such as Nextcloud, ownCloud, KDrive, OneDrive, Dropbox, Google Drive, and other storages which support WebDAV protocol.
 On Device section allows you to create new and work on your local documents without internet connection.
 Settings section allows you to adjust the application settings.
Recent section
The Recent section contains the files that you have recently opened both on the ONLYOFFICE portal and on the device.
Here you can:
- quickly access recently opened/edited files,
- search and sort the files,
- remove a file from recent using the corresponding file menu option.
When you open the Recent section for the first time, you will be asked to allow the app to access photos, media and files on your device.
Clouds section
The
Clouds section allows you to connect cloud services. Here you can:
- connect your already existing ONLYOFFICE cloud or create a new one and work on the files stored on your portal in online mode, share documents with other portal users and edit them collaboratively with your team,
- connect third-party clouds, such as Nextcloud, ownCloud, KDrive, OneDrive, Dropbox, Google Drive, and other storages which support WebDAV protocol.
Connecting to the ONLYOFFICE portal
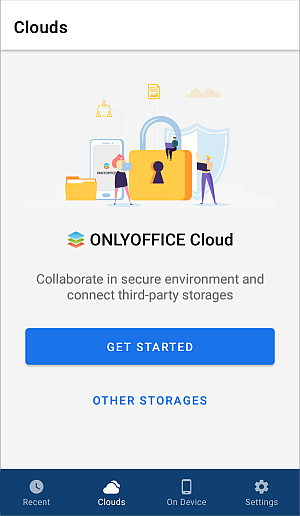
When you launch the Documents app for the first time and switch to the Clouds section, the following screen opens:
To sign in to your portal:
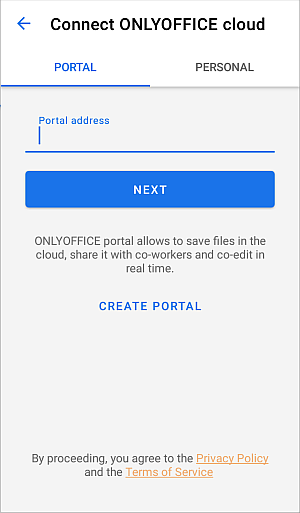
- tap the GET STARTED option to open the Connect ONLYOFFICE cloud panel.
- on the PORTAL tab, enter your existing portal address (https://portalname.onlyoffice.com) and tap NEXT.
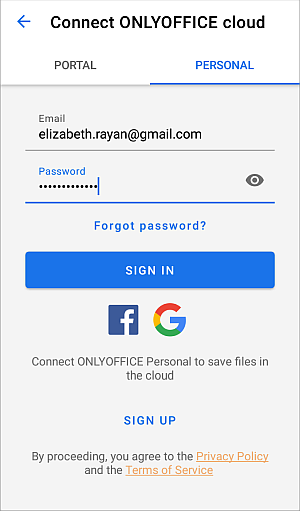
- enter your email address and password you use to access your portal.
- tap the SIGN IN button.
Alternatively, you can specify the portal address and sign in to your portal using your Facebook or Google account, if you have previously connected one of these accounts to your profile on the portal.
To access your Personal account (previously created at personal.onlyoffice.com), switch to the PERSONAL tab, enter your email address and password, then tap the SIGN IN button.
You can also log in by using the SignOn. To do this, tap the corresponding icon and in the window that opens, enter the account credentials. At the moment, authorization through Google and Facebook accounts is supported.
Creating a new ONLYOFFICE portal
If you do not have an ONLYOFFICE account, you can easily create a new portal right from the mobile application when it is launched:
- tap the CREATE PORTAL link at the bottom of the Connect ONLYOFFICE cloud panel,
- fill in the registration form: create your Portal address (e.g. portalname.onlyoffice.com), enter your Email, First name, Last name and tap NEXT,
- enter and repeat a password, then tap the CREATE button.
By default, the password must be at least 8 but no more than 120 characters long.
To create a new Personal account,
- switch to the PERSONAL tab,
- tap the SIGN UP link at the bottom of screen,
- enter your email address, then tap the SIGN UP button,
- a confirmation link will be sent to the specified email address. Follow the link from the email message to confirm the registration and set a password.
To recover a password from the personal portal,
- switch to the PERSONAL tab,
- tap the Forgot password? link,
- enter the email to which your portal was registered,
- a recovery link will be sent to the specified email address. Follow the link from the email message to resotore your password.
ONLYOFFICE portal sections
To quickly switch between the Documents module sections, tap the necessary caption on the top: MY, SHARED WITH ME, FAVORITES, COMMON, PROJECTS, and TRASH or just swipe left or right in the folder and file list.

Your Portal contains the following sections:
-
My is a section that contains your personal documents;
-
Shared with me is a section that contains documents that were shared with you by other portal users;
-
Favorites is a section that contains documents and files previously marked as 'Favorites';
-
Common is a section that contains files and folders available to all portal users;
-
Projects is a section that contains folders corresponding to existing projects from the portal 'Projects' module;
-
Trash is a section where all deleted files are stored and can be restored or permanently deleted later.
Your Personal account contains the My documents, Favorites, and Trash sections.
Connecting third-party clouds
The
Clouds section allows to connect third-party clouds, such as Nextcloud, ownCloud, KDrive, OneDrive, Dropbox, and other storages which support WebDAV protocol. This option can be used if you do not want to create an ONLYOFFICE portal, but want to work on your documents from a third-party storage using ONLYOFFICE app.
Tap the Connect third-party storage option at the Clouds panel and choose the necessary service icon: Nextcloud, ownCloud, KDrive, SharePoint, Box, Dropbox, Google Drive, OneDrive, Yandex.Disk, or Other WebDAV storage:
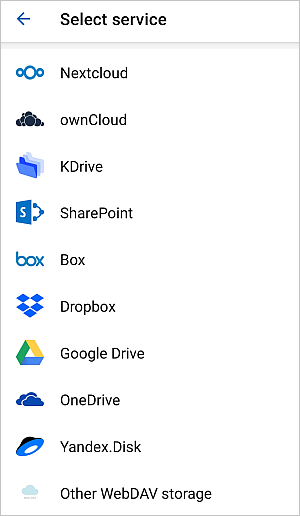
To connect the selected storage, specify the following data:
- specify your WebDAV server address in the Connection URL field (it's not required for KDrive, OneDrive, Dropbox, and Google Drive).
- enter the Login and Password that you use to access your third-party account.
- press the Next button.
Starting from v.5.3.0, you can connect OneDrive and Dropbox. These services are connected without using the WebDAV protocol. You will need to specify your login and password.
After you connect a WebDAV account, you can:
The connected third-party storages are displayed in the connected clouds list at the account management panel. To open a different connected cloud, tap it in the list.
Account management
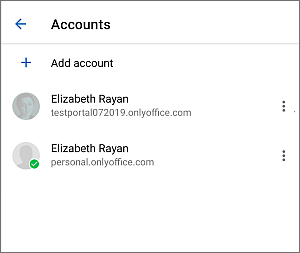
You can connect several cloud accounts to the Documents app (e.g., your accounts from both the corporate portal and personal office as well as several third-party storages) to quickly and easily switch between all your existing accounts and access necessary files.
If you have already signed in to a cloud account, tap the downward arrow icon  next to your profile displayed in the left part of the top panel.
The Accounts panel opens. The green checkmark designates the currently used account. To switch to another account, tap one of the connected accounts in the list.
Tap the  icon to the left of the necessary account to open the following screen:
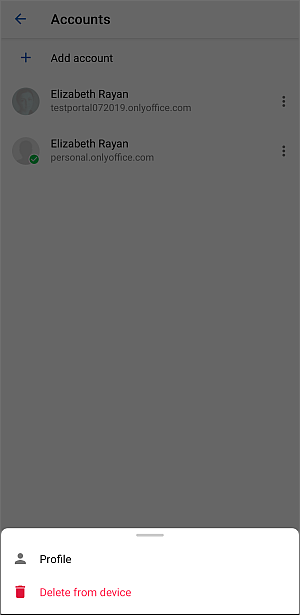
- Profile allows you to view the information about the current user: Username, Email, Portal address, Type (User or Guest). On this screen, you can also log out from the current account or sign in to another connected account:
- The Log out option is available for the currently used account.
- The Sign in option is available for the account which is not used currently.
- Delete from device allows you to remove the account from the list of connected accounts. You will be able to connect it again later, if necessary.
To connect another account:
- at the account management panel, tap the
 Add account menu item,
- on the Clouds panel that opens, connect another account as described in the Connecting to a portal section above.
On Device section
The On Device section allows you to create new, view and manage documents stored on your device in offline mode without internet connection.
Use the  icon in the right part of the top toolbar to browse the local file you want to open.
To quickly access a local file, you can add it to the file manager. To do that, tap the
 icon in the lower right corner, select the
 Import file option and open the necessary file. The opened file will remain displayed in the On Device section, so you can work with it quickly and conveniently.
Using the file manager in this section you can:
- create new documents, spreadsheets and presentations to start working on your local files,
- create new folders to organize your local files,
- rename files,
- remove files and folders,
- sort and filter files,
- add photos,
- preview photos and videos,
- view PDF files,
- move and copy files to other folders on your device,
- upload files to the portal (if the portal is connected).
You can open local files for editing. OOXML (DOCX, XLSX, PPTX), ODF (ODT, ODS, ODP) and DOCXF file formats are supported. You can also open local OFORM files for filling out fields.
When a local file is opened for editing, the following operations on documents are available:
- Document Editor
- editing text and using the copy, cut, and paste functions,
- editing pages by adding page numbers, section breaks, footnotes, and endnotes,
- inserting tables, images, autoshapes, charts, hyperlinks,
- using the Find and Replace and Spell-checking functions,
- entering the preview mode, configuring and printing out a set number of document pages,
- adding comments and managing the review options using the collaboration tools,
- exporting to DOCX, PDF, ODT, DOTX, PDF/A, OTT, RTF, TXT, DOCXF, OFORM formats.
- Spreadsheet Editor
- creating new and managing existing worksheets,
- inserting and formatting text in cells,
- editing background color, borders, style and other cell properties,
- working on formulas, inserting images, autoshapes, charts, and hyperlinks,
- sorting and filtering data,
- adding comments and managing them using the collaboration tools,
- using the Find and Replace function,
- entering the preview mode and configuring printing settings,
- exporting to XLSX, PDF, ODS, XLTX, PDF/A, OTS, CSV formats.
- Presentation Editor
- inserting and editing slides, tables, charts, autoshapes, images, hyperlinks,
- previewing your presentation,
- applying different transitions for slides,
- adding comments and managing them using the collaboration tools,
- using the Find and Replace function,
- entering the preview mode, configuring and printing out a set number of slides,
- exporting to PPTX, PDF, ODP, POTX, PDF/A, OTP formats.
Settings section
The
Settings section allows you to adjust some application settings as well as view info about the app.
Adjusting settings
Tap the  Settings option to open the available application settings.
Tap the Share app analytics to allow error messages to be sent and analyzed for further application improvements. This option is enabled by default.
You can turn on the Upload files only using Wi-Fi switcher in the Wi-Fi settings section.
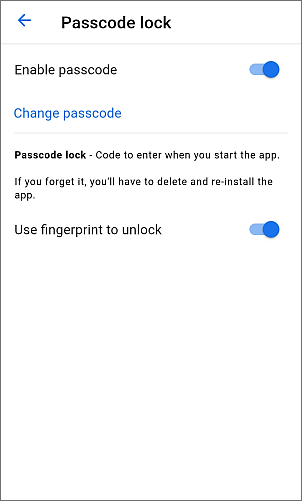
You can enable a passcode protection for your application in the Security settings section. To do that:
- tap the Passcode lock
 menu item,
- tap the Enable passcode option,
- specify your 4-digits passcode and confirm it.
When the passcode is turned on, you will be able to change it or turn it off using the corresponding options in the Passcode Lock section.
If you forget your passcode, you will have to delete and reinstall the application.
If your device supports biometric authentication, you can also enable the Use fingerprint to unlock option to access the app using fingerprint. When enabling this option, it's also required to enter your passcode.
To free up space on your device, you can clear the application cache. To do that:
- tap the Clear cache option in the Common settings section,
- tap the Accept button in the confirmation window.
Change the Color theme to your liking:
Viewing information
The Settings section also contains the About section with the information about the application, the Help option that allows to open the application help, and the Feedback and support option that allows to leave a review.