Insert equations
The Presentation Editor allows you to create equations using the built-in templates, edit them, insert special characters (including mathematical operators, Greek letters, accents, etc.).
Add a new equation
To insert an equation from the gallery,
- put the cursor where you want to place the equation,
- switch to the Insert tab of the top toolbar,
- click the arrow next to the Equation icon on the top toolbar,
-
select the required equation category in the toolbar above the inserted equation,
or
in the opened drop-down list select the equation category you need.
The following categories are currently available: Symbols, Fractions, Scripts, Radicals, Integrals, Large Operators, Brackets, Functions, Accents, Limits and Logarithms, Operators, Matrices,
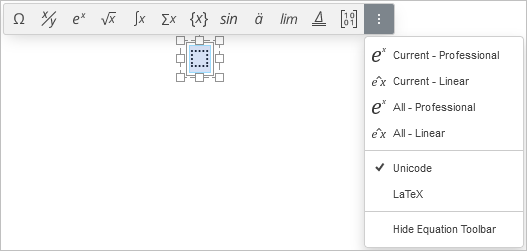
- click the Equation Settings symbol in the toolbar above the inserted equation to access more settings, e.g., Unicode or LaTeX, Professional or Linear,
- click the certain symbol/equation in the corresponding set of templates,
- to hide the toolbar, click the Hide Equation Toolbar option in the Equation Settings.
The selected symbol/equation box will be inserted in the center of the current slide.
If you do not see the equation box border, click anywhere within the equation - the border will be displayed as a dashed line. The equation box can be freely moved, resized or rotated on the slide. To do that, click on the equation box border (it will be displayed as a solid line) and use the corresponding handles.
Each equation template represents a set of slots. A slot is a position for each element that makes up the equation. An empty slot (also called as a placeholder) has a dotted outline . You need to fill in all the placeholders specifying the necessary values.
Enter values
The insertion point specifies where the next character you enter will appear. To position the insertion point precisely, click within a placeholder and use the keyboard arrows to move the insertion point one character left/right.
Once the insertion point is positioned, you can fill in the placeholder:
- enter the desired numeric/literal value using the keyboard,
- insert a special character using the Symbols palette from the Equation menu on the Insert tab of the top toolbar or typing them from the keyboard (see the Math AutoСorrect option description),
- add another equation template from the palette to create a complex nested equation. The size of the primary equation will be automatically adjusted to fit its content. The size of the nested equation elements depends on the primary equation placeholder size, but it cannot be smaller than the sub-subscript size.
To add some new equation elements, you can also use the right-click menu options:
- To add a new argument that goes before or after the existing one within Brackets, you can right-click on the existing argument and select the Insert argument before/after option from the menu.
- To add a new equation within Cases with several conditions from the Brackets group, you can right-click on an empty placeholder or entered equation within it and select the Insert equation before/after option from the menu.
- To add a new row or a column in a Matrix, you can right-click on a placeholder within it, select the Insert option from the menu, then select Row Above/Below or Column Left/Right.
Note: currently, equations cannot be entered using the linear format, i.e. \sqrt(4&x^3).
When entering the values of mathematical expressions, you do not need to use Spacebar because spaces between the characters and signs of operations are set automatically.
If the equation is too long and does not fit to a single line within the text box, automatic line breaking appears while you are typing. You can also insert a line break in a specific position by right-clicking on a mathematical operator and selecting the Insert manual break option from the menu. The selected operator will start a new line. To delete the added manual line break, right-click on the mathematical operator that starts a new line and select the Delete manual break option.
Format equations
By default, the equation within the text box is horizontally centered and vertically aligned to the top of the text box. To change its horizontal/vertical alignment, put the cursor within the the equation box (the text box borders will be displayed as dashed lines) and use the corresponding icons on the Home tab of the top toolbar.
To increase or decrease the equation font size, click anywhere within the equation box and select the necessary font size from the list on the Home tab of the top toolbar. All the equation elements will change correspondingly.
The letters within the equation are italicized by default. If necessary, you can change the font style (bold, italic, strikeout) or color for a whole equation or its part. The underlined style can be applied to the entire equation only, not to individual characters. Select the necessary part of the equation by clicking and dragging. The selected part will be highlighted blue. Then use the necessary buttons on the Home tab of the top toolbar to format the selection. For example, you can remove the italic format for ordinary words that are not variables or constants.
To modify some equation elements, you can also use the right-click menu options:
- To change the Fractions format, you can right-click on a fraction and select the Change to skewed/linear/stacked fraction option from the menu (the available options differ depending on the selected fraction type).
- To change the Scripts position relating to text, you can right-click on the equation that includes scripts and select the Scripts before/after text option from the menu.
- To change the argument size for Scripts, Radicals, Integrals, Large Operators, Limits and Logarithms, Operators as well as for overbraces/underbraces and templates with grouping characters from the Accents group, you can right-click on the argument you want to change and select the Increase/Decrease argument size option from the menu.
- To specify whether an empty degree placeholder should be displayed or not for a Radical, you can right-click on the radical and select the Hide/Show degree option from the menu.
- To specify whether an empty limit placeholder should be displayed or not for an Integral or Large Operator, you can right-click on the equation and select the Hide/Show top/bottom limit option from the menu.
- To change the limits position relating to the integral or operator sign for Integrals or Large Operators, you can right-click on the equation and select the Change limits location option from the menu. The limits can be displayed to the right of the operator sign (as subscripts and superscripts) or directly above and below the operator sign.
- To change the limits position relating to text for Limits and Logarithms and templates with grouping characters from the Accents group, you can right-click on the equation and select the Limit over/under text option from the menu.
- To choose which of the Brackets should be displayed, you can right-click on the expression within them and select the Hide/Show opening/closing bracket option from the menu.
- To control the Brackets size, you can right-click on the expression within them. The Stretch brackets option is selected by default so that the brackets can grow according to the expression within them, but you can deselect this option to prevent brackets from stretching. When this option is activated, you can also use the Match brackets to argument height option.
- To change the character position relating to text for overbraces/underbraces or overbars/underbars from the Accents group, you can right-click on the template and select the Char/Bar over/under text option from the menu.
- To choose which borders should be displayed for a Boxed formula from the Accents group, you can right-click on the equation and select the Border properties option from the menu, then select Hide/Show top/bottom/left/right border or Add/Hide horizontal/vertical/diagonal line.
- To specify whether empty placeholders should be displayed or not for a Matrix, you can right-click on it and select the Hide/Show placeholder option from the menu.
To align some equation elements, you can use the right-click menu options:
- To align equations within Cases with several conditions from the Brackets group, you can right-click on an equation, select the Alignment option from the menu, then select the alignment type: Top, Center, or Bottom.
- To align a Matrix vertically, you can right-click on the matrix, select the Matrix Alignment option from the menu, then select the alignment type: Top, Center, or Bottom.
- To align elements within a Matrix column horizontally, you can right-click on a placeholder within the column, select the Column Alignment option from the menu, then select the alignment type: Left, Center, or Right.
Delete equation elements
To delete a part of the equation, select the part you want to delete by dragging the mouse or holding down the Shift key and using the arrow buttons, then press the Delete key.
A slot can only be deleted together with the template it belongs to.
To delete the entire equation, click on the equation box border (it will be displayed as a solid line) and and press the Delete key.
To delete some equation elements, you can also use the right-click menu options:
- To delete a Radical, you can right-click on it and select the Delete radical option from the menu.
- To delete a Subscript and/or Superscript, you can right-click on the expression that contains them and select the Remove subscript/superscript option from the menu. If the expression contains scripts that go before text, the Remove scripts option is available.
- To delete Brackets, you can right-click on the expression within them and select the Delete enclosing characters or Delete enclosing characters and separators option from the menu.
- If the expression within Brackets inclides more than one argument, you can right-click on the argument you want to delete and select the Delete argument option from the menu.
- If Brackets enclose more than one equation (i.e. Cases with several conditions), you can right-click on the equation you want to delete and select the Delete equation option from the menu.
- To delete a Limit, you can right-click on it and select the Remove limit option from the menu.
- To delete an Accent, you can right-click on it and select the Remove accent character, Delete char or Remove bar option from the menu (the available options differ depending on the selected accent).
- To delete a row or a column of a Matrix, you can right-click on the placeholder within the row/column you need to delete, select the Delete option from the menu, then select Delete Row/Column.
Convert equations
If you open an existing document containing equations which were created with an old version of equation editor (for example, with MS Office versions before 2007), you need to convert these equations to the Office Math ML format to be able to edit them.
To convert an equation, double-click it. The warning window will appear:
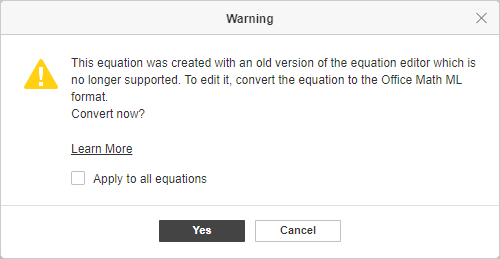
To convert the selected equation only, click the Yes button in the warning window. To convert all equations in this document, check the Apply to all equations box and click Yes.
Once the equation is converted, you can edit it.
Return to previous page