Insert autoshapes
-
insert objects
-
insert autoshape
-
change color
-
Select background color for a paragraph
-
Set font type, size, and color
-
Insert tables
-
Set font type, size, and color
-
Select cell background color
-
Add cell borders
-
Insert autoshapes
-
Set font type, size, and color
-
Insert tables
-
Select background color for a paragraph
-
Set font type, size, and color
-
Insert tables
-
Set font type, size, and color
-
Select cell background color
-
Add cell borders
-
Insert autoshapes
-
Set font type, size, and color
-
Insert tables
-
Select background color for a paragraph
-
Insert tables
-
Set font type, size, and color
-
Select cell background color
-
Add cell borders
-
Insert autoshapes
-
Set font type, size, and color
-
Insert tables
-
Select background color for a paragraph
-
Set font type, size, and color
-
Insert tables
-
Set font type, size, and color
-
Select cell background color
-
Add cell borders
-
Insert autoshapes
-
Set font type, size, and color
-
Insert tables
-
align objects
-
arrange objects
-
text wrapping
-
position object
-
element background
-
modify object
Insert an autoshape
To add an autoshape in the Document Editor,
- switch to the Insert tab of the top toolbar,
- click the Shape icon on the top toolbar,
- select one of the available autoshape groups from the Shape Gallery: Recently Used, Basic Shapes, Figured Arrows, Math, Charts, Stars & Ribbons, Callouts, Buttons, Rectangles, Lines,
- click the necessary autoshape within the selected group,
- place the mouse cursor where the shape should be added,
-
once the autoshape is added, you can change its size, position and properties.
Note: to add a caption to an autoshape, make sure the required shape is selected on the page and start typing your text. The added text becomes a part of the autoshape (when you move or rotate the shape, the text moves or rotates with it).
It's also possible to add a caption to the autoshape. To learn more on how to work with captions for autoshapes, you can refer to this article.
Move and resize autoshapes
To change the autoshape size, drag small squares situated on the shape edges. To maintain the original proportions of the selected autoshape while resizing, hold down the Shift key and drag one of the corner icons.
When modifying some shapes, for example figured arrows or callouts, the yellow diamond-shaped icon is also available. It allows you to adjust some aspects of the shape, for example, the length of the head of an arrow.
To alter the autoshape position, use the icon that appears after hovering your mouse cursor over the autoshape. Drag the autoshape to the required position without releasing the mouse button.
When you move the autoshape, the guide lines are displayed to help you precisely position the object on the page (if the selected wrapping style is not inline).
To move the autoshape by one-pixel increments, hold down the Ctrl key and use the keybord arrows.
To move the autoshape strictly horizontally/vertically and prevent it from moving in a perpendicular direction, hold down the Shift key when dragging.
To rotate the autoshape, hover the mouse cursor over the rotation handle and drag it clockwise or counterclockwise. To constrain the rotation angle to 15 degree increments, hold down the Shift key while rotating.
Note: the list of keyboard shortcuts that can be used when working with objects is available here.
Copy autoshape style formatting
To copy a certain autoshape style formatting,
- select the autoshape whose formatting you need to copy with the mouse or using the keyboard,
- click the Copy style icon on the Home tab of the top toolbar (the mouse pointer will look like this ),
- select the required autoshape to apply the same formatting.
Adjust autoshape settings
- Cut, Copy, Paste - standard options which are used to cut or copy the selected text/object and paste the previously cut/copied text passage or object to the current cursor position.
- Print selection is used to print out only a selected portion of the document.
- Accept / Reject changes is used to accept or to reject tracked changes in a shared document.
-
Edit Points is used to customize or to change the curvature of your shape.
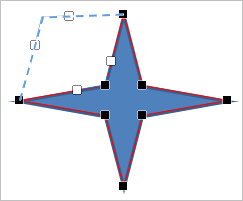
- To activate a shape’s editable anchor points, right-click the shape and choose Edit Points from the menu or click the Edit shape > Edit points option on the right panel. The black squares that become active are the points where two lines meet, and the red line outlines the shape. Click and drag it to reposition the point, and to change the shape outline.
-
Once you click the anchor point, two blue lines with white squares at the ends will appear. These are Bezier handles that allow you to create a curve and to change a curve’s smoothness.
-
As long as the anchor points are active, you can add and delete them.
To add a point to a shape, hold Ctrl and click the position where you want to add an anchor point.
To delete a point, hold Ctrl and click the unnecessary point.
- Arrange is used to bring the selected autoshape to foreground, send it to background, move forward or backward as well as group or ungroup shapes to perform operations with several of them at once. To learn more on how to arrange objects, please refer to this page.
- Align is used to align the shape to the left, in the center, to the right, at the top, in the middle, at the bottom. To learn more on how to align objects, please refer to this page.
- Wrapping Style is used to select a text wrapping style from the available ones - inline, square, tight, through, top and bottom, in front, behind - or edit the wrap boundary. The Edit Wrap Boundary option is available only if you select a wrapping style other than Inline. Drag wrap points to customize the boundary. To create a new wrap point, click anywhere on the red line and drag it to the necessary position.
- Rotate is used to rotate the shape by 90 degrees clockwise or counterclockwise as well as to flip the shape horizontally or vertically.
- Save as picture is used to save the shape as a picture on your hard drive.
- Shape Advanced Settings is used to open the 'Shape - Advanced Settings' window.
Some of the autoshape settings can be altered using the Shape settings tab of the right sidebar. To activate it click the shape and choose the Shape settings icon on the right. Here you can change the following properties:
-
Fill - use this section to select the autoshape fill. You can choose the following options:
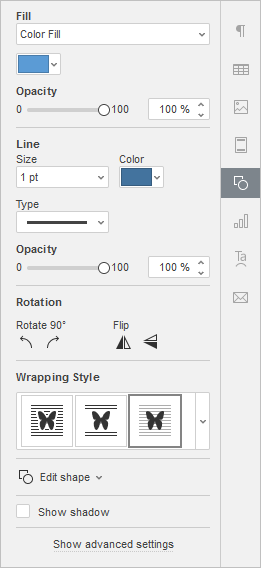
- Opacity - use this section to set an Opacity level dragging the slider or entering the percent value manually. The default value is 100%. It corresponds to the full opacity. The 0% value corresponds to the full transparency.
-
Line - use this section to change the width, color or type of the autoshape line.
- To change the line width, select one of the available options from the Size dropdown list. The available options are: 0.5 pt, 1 pt, 1.5 pt, 2.25 pt, 3 pt, 4.5 pt, 6 pt. Alternatively, select the No Line option if you don't want to use any line.
- To change the line color, click on the colored box below and select the necessary color.
- To change the line type, select the necessary option from the corresponding dropdown list (a solid line is applied by default, you can change it to one of the available dashed lines).
- To change the line opacity, enter the required value manually or use the corresponding slider bar.
-
Rotation is used to rotate the shape by 90 degrees clockwise or counterclockwise as well as to flip the shape horizontally or vertically. Click one of the buttons:
- to rotate the shape by 90 degrees counterclockwise
- to rotate the shape by 90 degrees clockwise
- to flip the shape horizontally (left to right)
- to flip the shape vertically (upside down)
- Wrapping Style - use this section to select a text wrapping style from the available ones - inline, square, tight, through, top and bottom, in front, behind (for more information see the advanced settings description below).
- Edit shape - use this section to edit the shape points or to replace the current autoshape with another one selected from the dropdown list.
-
Edit points is used to customize or to change the curvature of your shape.
-
Once you click the anchor point, two blue lines with white squares at the ends will appear. These are Bezier handles that allow you to create a curve and to change a curve’s smoothness.

-
As long as the anchor points are active, you can add and delete them.
To add a point to a shape, hold Ctrl and click the position where you want to add an anchor point.
To delete a point, hold Ctrl and click the unnecessary point.
- Change Shape is used to replace the current autoshape. Choose another autoshape from the dropdown list.
- Show shadow - check this option to display the shape with a shadow.
Adjust autoshape advanced settings
To change the advanced settings of the autoshape, right-click it and select the Advanced Settings option in the menu or use the Show advanced settings link on the right sidebar. The 'Shape - Advanced Settings' window will open:
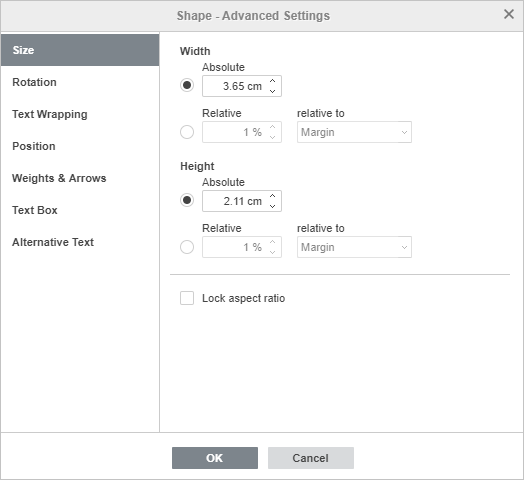
The Size tab contains the following parameters:
-
Width - use one of these options to change the autoshape width.
- Absolute - specify an exact value measured in absolute units i.e. Centimeters/Points/Inches (depending on the option specified on the File -> Advanced Settings... tab).
- Relative - specify a percentage relative to the left margin width, the margin (i.e. the distance between the left and right margins), the page width, or the right margin width.
-
Height - use one of these options to change the autoshape height.
- Absolute - specify an exact value measured in absolute units i.e. Centimeters/Points/Inches (depending on the option specified on the File -> Advanced Settings... tab).
- Relative - specify a percentage relative to the margin (i.e. the distance between the top and bottom margins), the bottom margin height, the page height, or the top margin height.
- If the Lock aspect ratio option is checked, the width and height will be changed together preserving the original shape aspect ratio.
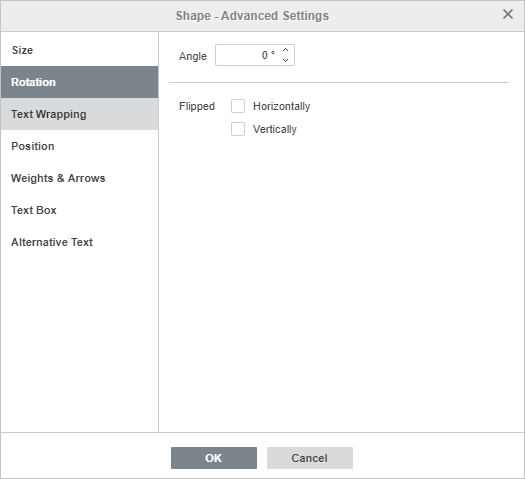
The Rotation tab contains the following parameters:
- Angle - use this option to rotate the shape by an exactly specified angle. Enter the necessary value measured in degrees into the field or adjust it using the arrows on the right.
- Flipped - check the Horizontally box to flip the shape horizontally (left to right) or check the Vertically box to flip the shape vertically (upside down).
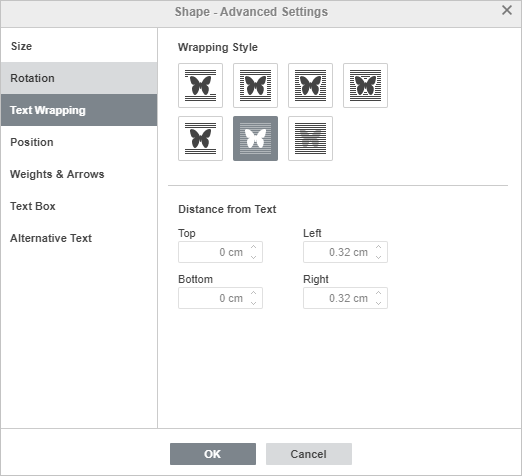
The Text Wrapping tab contains the following parameters:
-
Wrapping Style - use this option to change the way the shape is positioned relative to the text: it will either be a part of the text (in case you select the inline style) or bypassed by it from all sides (if you select one of the other styles).
If you select the square, tight, through, or top and bottom styles, you will be able to set up some additional parameters - distance from text at all sides (top, bottom, left, right).
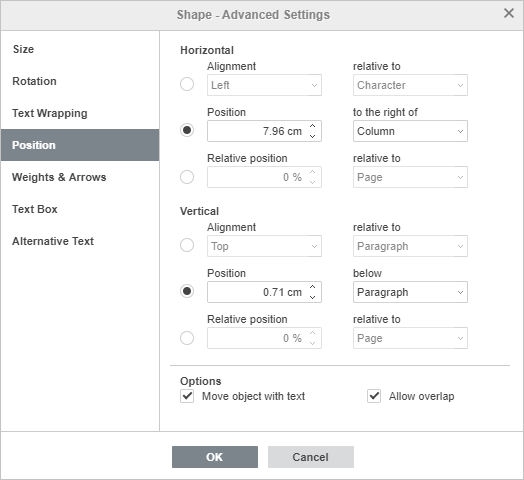
The Position tab is available only if the selected wrapping style is not inline. This tab contains the following parameters that vary depending on the selected wrapping style:
-
The Horizontal section allows you to select one of the following three autoshape positioning types:
- Alignment (left, center, right) relative to character, column, left margin, margin, page or right margin,
- Absolute Position measured in absolute units i.e. Centimeters/Points/Inches (depending on the option specified on the File -> Advanced Settings... tab) to the right of character, column, left margin, margin, page or right margin,
- Relative position measured in percent relative to the left margin, margin, page or right margin.
-
The Vertical section allows you to select one of the following three autoshape positioning types:
- Alignment (top, center, bottom) relative to line, margin, bottom margin, paragraph, page or top margin,
- Absolute Position measured in absolute units i.e. Centimeters/Points/Inches (depending on the option specified on the File -> Advanced Settings... tab) below line, margin, bottom margin, paragraph, page or top margin,
- Relative position measured in percent relative to the margin, bottom margin, page or top margin.
- Move object with text ensures that the autoshape moves along with the text to which it is anchored.
- Allow overlap makes it possible for two autoshapes to overlap if you drag them near each other on the page.
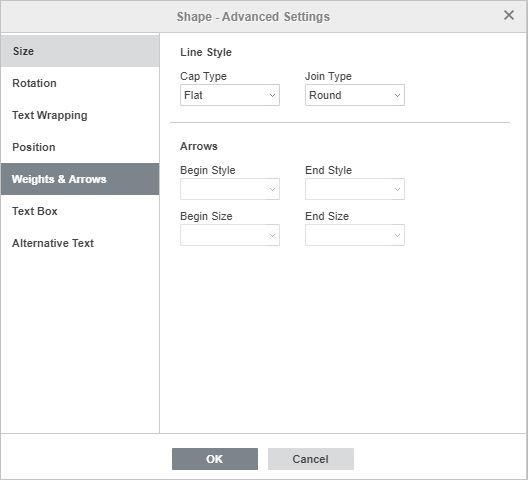
The Weights & Arrows tab contains the following parameters:
-
Line Style - this option group allows specifying the following parameters:
- Arrows - this option group is available if a shape from the Lines shape group is selected. It allows setting the arrow Start and End Style and Size by selecting the appropriate option from the dropdown lists.
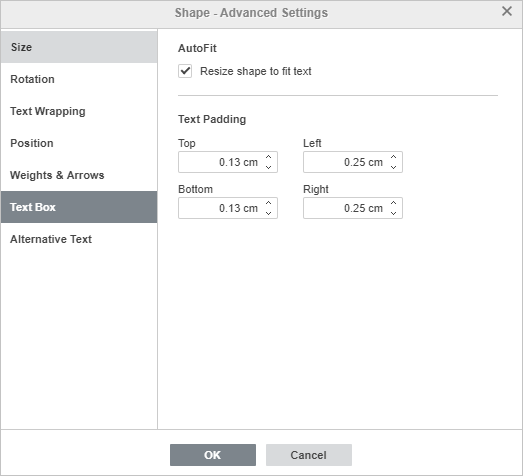
The Text Padding tab allows changing the Top, Bottom, Left and Right internal margins of the autoshape (i.e. the distance between the text within the shape and the autoshape borders).
Note: this tab is only available if text is added within the autoshape, otherwise the tab is disabled.
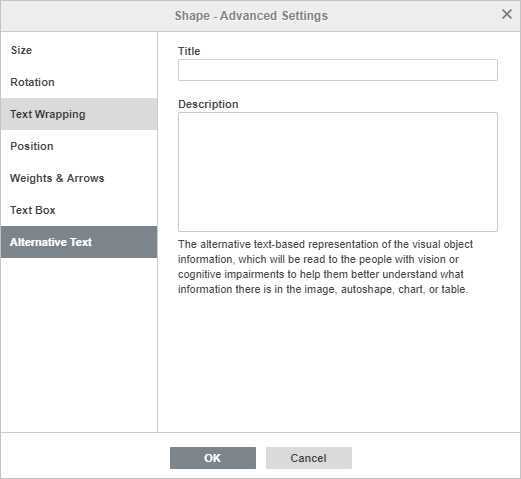
The Alternative Text tab allows specifying a Title and Description which will be read to people with vision or cognitive impairments to help them better understand what information the shape contains.
Return to previous page